Für ein anstehendes Treffen im Stil der 1910er brauche ich dringend ein Kleid, denn beim Garderobe endet in den 1900ern.
Ich habe lange gesucht, bis ich ein Kleid gefunden habe, dass mir zusagt. Leider ist die Bandbreite und Variation ja sehr groß und ich habe mich wirklich schwer getan mich festzulegen. Letztlich ist mein Kleid von zwei Photographien inspiriert:
I’m in need of a dress for an upcoming 1910s-event, because my wardrobe ends in the 1900s. I searched for a long time until I found a dress that I liked. Unfortunately, the range and variation in this era is very large and I found it really difficult to find a favourite. Ultimately, my dress is inspired by two photographs:
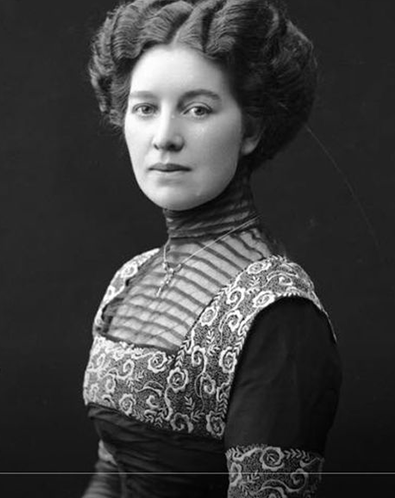
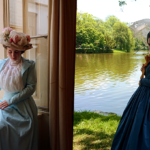
Links ist ein unbekanntes Mädchen mit einer wunderschönen Front und rechts ist eine Dame namens „Marie Eriksen“, angeblich auf 1911 datiert. Beides ohne Zweifel wunderschöne Kleider! Als Grundschnitt für das Oberteil habe ich Blacksnails 1880er-1890er Balltaille verwendet. Von dem wusste ich, dass es mir wie angegossen passt und zudem passt der Ausschnitt auch ziemlich gut für den geplanten Spitzeneinsatz.
On the left is an unknown girl with a beautiful dress front and on the right is a lady named „Marie Eriksen“, supposedly dated 1911. Both without a doubt beautiful dresses! I used Blacksnail’s 1880s-1890s ball waist as the base pattern for the top. I knew that it would fit me like a glove and the neckline also fits quite well for the planned lace insert.
Ich habe für das Projekt einen dunklen, aubergine-farbenen Baumwollstoff verwendet, der eigentlich mal für ein viktorianisches Kleid gedacht war, aber da ich damit nicht in die Pötte komme, dachte ich, ich verwende es lieber für dieses Projekt.
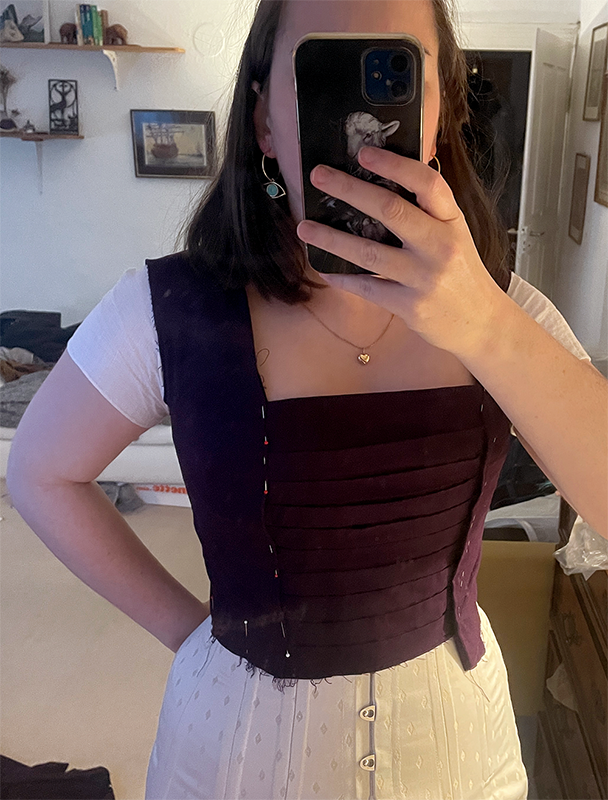
Für den Latz habe ich aus einem Futterstoff ein in die Lücke passendes Viereck ausgeschnitten und dann mit einem rechteckig (und weitaus längeren) Oberstoffstück die Falten darauf drapiert. Ursprünglich hatte ich die Falten nur rechts und links in der Naht fixiert, allerdings stellte sich beim ersten Anprobieren heraus, dass sie durch die Rundung der Brust und Bewegung meinerseits zum unschönen Aufspringen neigen. Also habe ich sie mit kleinen Handstichen von links unsichtbar fixiert, das hat das Problem dann behoben. Unter dem Latz wird das Kleid mit Haken und Ösen geschlossen, damit nicht ganz so viel Zug auf dem Latz ist, der später nur mit Druckknöpfen geschlossen werden soll. Später wird das vielleicht in der Erklärung der Verschlusstechnik etwas klarer.
I used a dark aubergine cotton fabric for the project that was originally intended for a Victorian dress, but since I can’t get into it I thought I’d use it for this project. For the bib, I cut a square out of a lining fabric to fit the gap and then draped the folds onto it with a rectangular (and much longer) piece of outer fabric. Originally, I had only fixed the pleats on the right and left in the seam, but when I tried it on for the first time, it turned out that the curve of the breast and movement on my part made them tend to unattractively open. So I fixed them invisibly from the left with small hand stitches, which then solved the problem. The dress is closed under the bib with hooks and eyelets so that there isn’t quite as much tension on the bib, which is only to be closed later with snaps. This will perhaps become a little clearer later in the explanation of the locking technology.
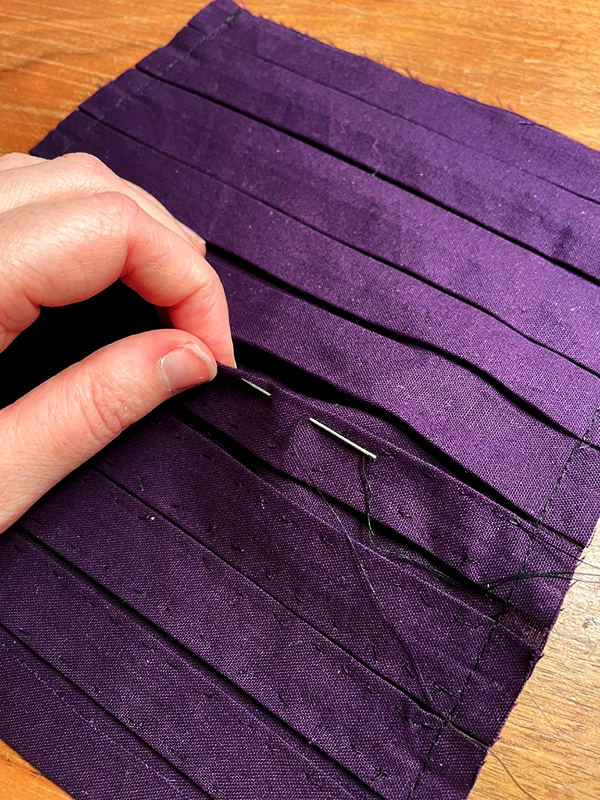
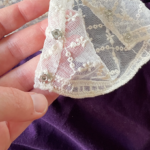
So sieht der eingesetzte Latz aus, hier bisher nur mit Nadeln fixiert. Auf beiden Seiten des Oberteils läuft eine Art überlappende Leiste herunter, unter der später die Druckknöpfe, bzw. die Naht versteckt liegt.
This is what the inserted bib looks like, previously only fixed with pins. A kind of overlapping strip runs down both sides of the top, under which the snaps or the seam will later be hidden.
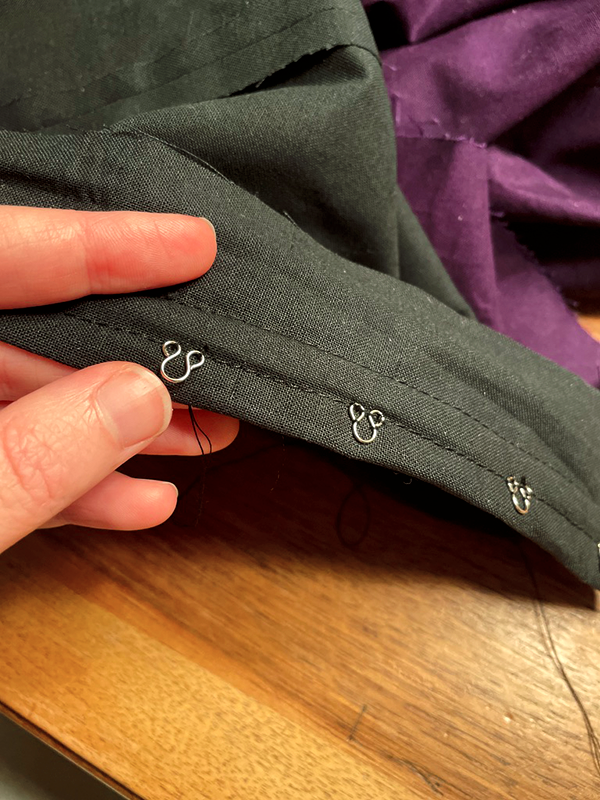
Zeit sich um den Rock zu kümmern. Dafür habe ich meinen edwardianischen Rockschnitt verwendet und ihn etwas verschmälert, da ich nicht ganz so viel Volumen brauche. Vorne habe ich ein schmales, gerade geschnittenes Rockteil eingesetzt, dass ich leider nochmal neu machen musste, weil ich mich beim Zuschneiden vermessen hatte und darum die Weite nicht zur Breite des Latzes passte – ja ärgerlich, aber ich hatte ja zum Glück genug Stoff übrig…er wird auch der Bequemlichkeit vorn geschlossen. Auf dem Bild stecken noch Nadeln drin, da natürlich die Druckknöpfe mit einer unsichtbaren Naht „gesichert“ werden müssen, sonst verzieht sich der Stoff unschön und es klafft eine Lücke auf.
Time to take care of the skirt. For this I used my Edwardian skirt cut and slimmed it down a bit as I don’t need quite as much volume. In the front I used a narrow, straight-cut skirt part that unfortunately I had to redo because I measured myself when cutting and therefore the width did not match the width of the bib – yes, annoying, but luckily I had enough fabric left over… it is also closed in front for convenience. There are still needles in the picture, because of course the press studs have to be „secured“ with an invisible seam, otherwise the fabric will warp and there will be a gap.


Bis zu dem Zeitpunkt war eigentlich geplant den Rock und das Oberteil separiert zu nähen und es beim Tragen mit Haken zu verbinden und einen Gürtel darüber zu legen. Durch die gefaltete Front hat mir das aber mit dem Gürtel aber gar nicht gefallen, also Planänderung! Hätte ich vorher gewusst, dass ich den Rockteil ansetze, hätte ich sicherlich nochmal anders zugeschnitten, sodass die Seitennähte auch sauber aufeinander treffen, aber bei dem dunklen Stoff fällt das glücklicherweise nicht ganz so ins Auge. Das Rock ansetzen hat mich am meisten Nerven gekostet und letztlich habe ich die Hilfe meiner Schwester gebraucht, bis es halbwegs gepasst hat und keine unschönen Falten mehr geschlagen hat.
Up to that point it was actually planned to sew the skirt and the top separately and to connect them with hooks when wearing them and to put a belt over them. But because of the folded bib, I didn’t like the belt at all, so change of plans! If I had known beforehand that I was going to put on the skirt part, I would certainly have cut it differently again so that the side seams also meet neatly, but fortunately with the dark fabric it is not so obvious. Putting the skirt on was the most nerve-wracking for me and in the end I needed my sister’s help until it fit more or less and didn’t have any more unsightly creases.
Der Spitzeneinsatz / The Lace-Insertation
Sieht schön aus und man stellt sich das so einfach vor, letztlich habe ich mich aber ewig davor gedrückt, weil ich irgendwie Sorge hatte, dass es ein Krampf wird. Diesmal unberechtigterweise, denn es ging ohne Probleme!
Ich habe in meinem Stoffvorrat schon eine Weile eine Spitze liegen, die einen wunderschönen Abschluss hat und die ich darum immer für eine edwardianische Bluse oder ähnliches im Sinn hatte. Zunächst dachte ich, dass das creme-farbene vielleicht ein zu harter Kontrast zu dem dunklen Stoff bildet und bin erstmal von einem dunklen Einsatz ausgegangen, doch nach vielem ausprobieren und hinhalten, habe ich mich dann für den hellen Tüllstoff entschieden.
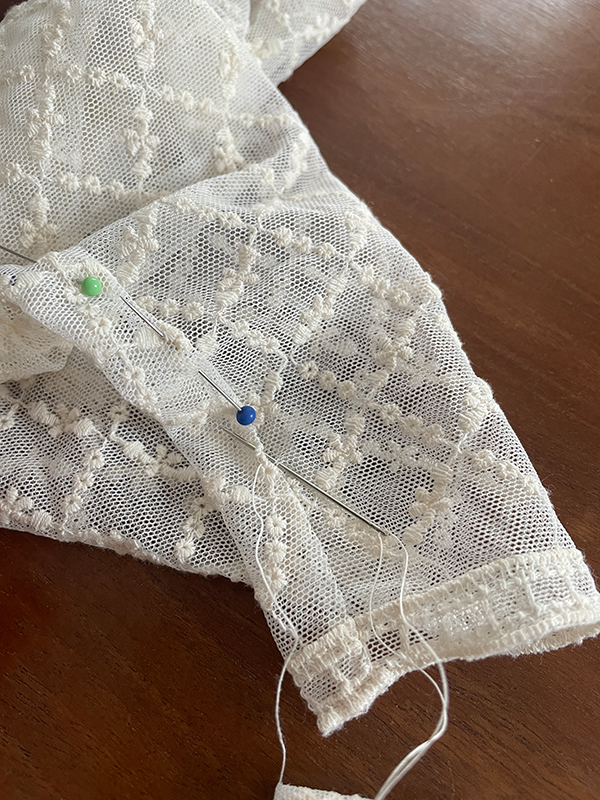
Für die Ärmel habe ich den vorderen Teil eines engen Ärmelschnittmusters genommen und etwas Nahtzugabe dazu gerechnet, damit genug Stoff zum Umschlagen und befestigen von Knöpfen ist. Ursprünglich dachte ich an kleine Perlmuttknöpfe, doch irgendwie hat mir keiner der Knöpfe zugesagt und so sind es auch hier unsichtbare Druckknöpfe geworden.
Looks nice and it’s so easy to imagine, but in the end I shied away from it for ages because I was kind of worried it would get crampy. This time unjustified, because it went without any problems!
I’ve had a lace in my stash for a while that has a beautiful finish so I always had it in mind for an Edwardian blouse or something. At first I thought that the cream-colored might be too much of a contrast to the dark fabric and I initially assumed a dark insert, but after a lot of trying, I then decided on the light-colored tulle fabric. For the sleeves, I took the front part of a tight sleeve pattern and added some seam allowance so there was enough fabric to turn up and fasten buttons. Originally I thought of small mother-of-pearl buttons, but somehow none of the buttons appealed to me and so these are invisible snaps.
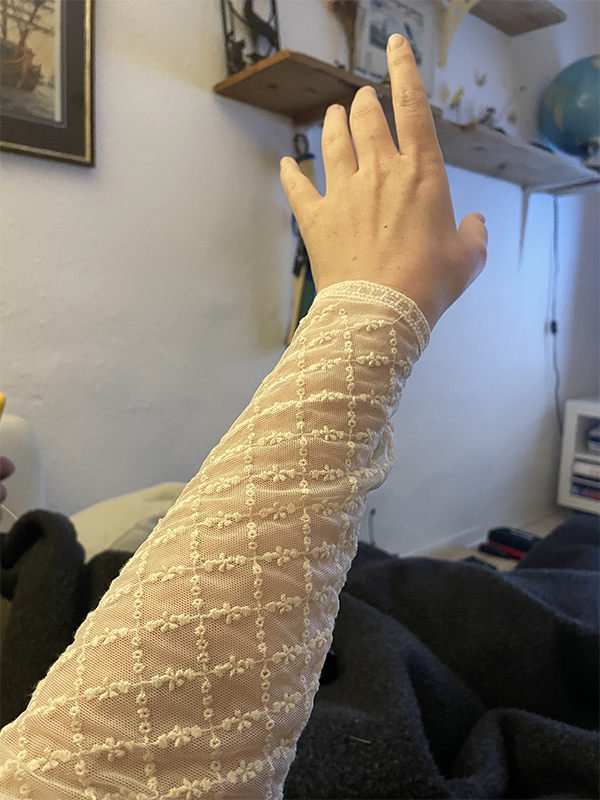
Für den Ausschnitt habe ich aus zwei Vierecken mir ein passendes Schnittmuster gebastelt. Der Kragen ist ein gerader Streifen (aufgrund der oberen Kante ging das nicht gerundet), der an dem größeren Teil festgenäht wird. Dadurch, dass der Tüll ein wenig elastisch ist verspielt sich das alles sehr schön und schlägt keine unschönen Falten. Geschlossen wird das Tüllding im Nacken mit Druckknöpfen.
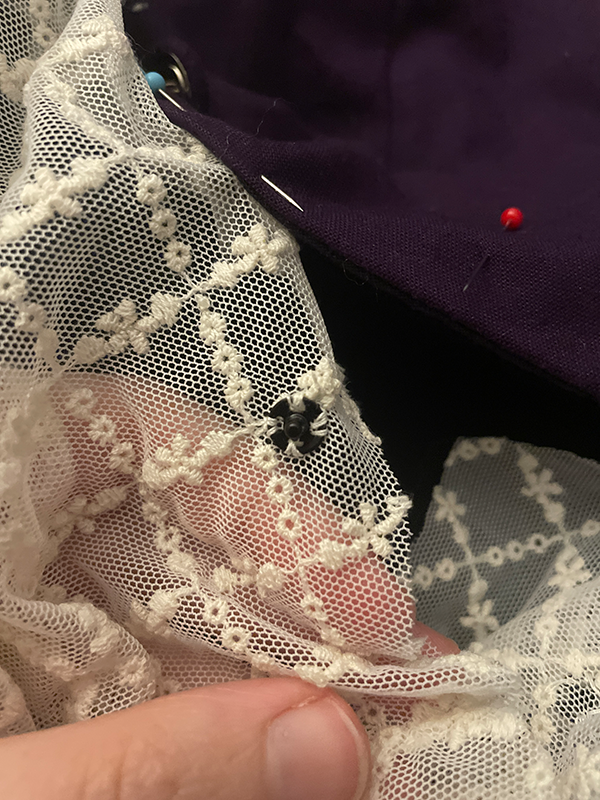
Ich habe dann die Tüllsachen angezogen und darüber das Kleid und mir dann den Tüll am Oberteil feststecken lassen, bzw mit Stecknadeln an der Kante entlang, an der Kleid und Tüll aufeinander treffen. Auf diese Weise konnte ich dann den Tüll ans Kleid nähen, bzw die Druckknöpfe zum Verschließen befestigen.
For the neckline, I made a suitable pattern out of two squares. The collar is a straight strip (couldn’t be rounded due to the top edge) that is sewn to the larger part. Due to the fact that the tulle is a bit elastic, everything is very playful and doesn’t create any unsightly folds. The tulle thing is closed in the neck with snaps.
I then put on the tulle things, then the dress over it and then had the tulle pinned to the bodice, or with pins along the edge where the dress and tulle meet. In this way I could then sew the tulle to the dress or attach the snaps to close it.

Derweil habe ich mich auch zu den Ärmeln aufraffen können und ich habe Bezogene Knöpfe hergestellt, dekorativ für die Front, die mich einiges an Nerven gekostet haben. In Zukunft werde ich wohl Knöpfe wieder komplett selbst beziehen und keine vorgefertigten Metallknöpfe verwenden, das schon meine Geduld und auch meine Fingerkuppen…
In the meantime I was able to pull myself together for the sleeves and I made covered buttons, decorative for the front, which cost me quite a bit of nerves. In the future, I will probably cover all the buttons myself again and not use any prefabricated metal buttons, which takes my patience and my fingertips…
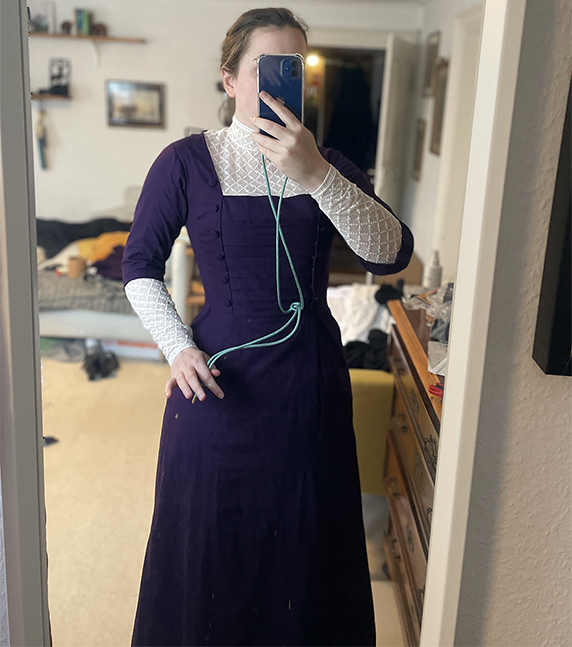
Das ist das Kleid in fertigem Zustand und zum ersten Mal mit allem geschlossen. Darunter trage ich einen dünnen, edwardianischen Unterrock.
This is the dress in finished condition and closed for the first time with everything. Underneath I wear a thin Edwardian petticoat.
Der Hut
Eigentlich habe ich ja schon einen schön dekorierten, edwardianischen Hut. Aber einmal auf den Kopf gelegt hat er mir gar nicht dazu gefallen…also hab ich kurzerhand mal ganz spontan und schnell noch einen Hut gezaubert. Natürlich ist die Auswahl von Hüten gigantisch in der Zeit, schwer sich festzulegen, aber ich dachte zu einem schlichten Kleid muss ein auffälligerer Hut.
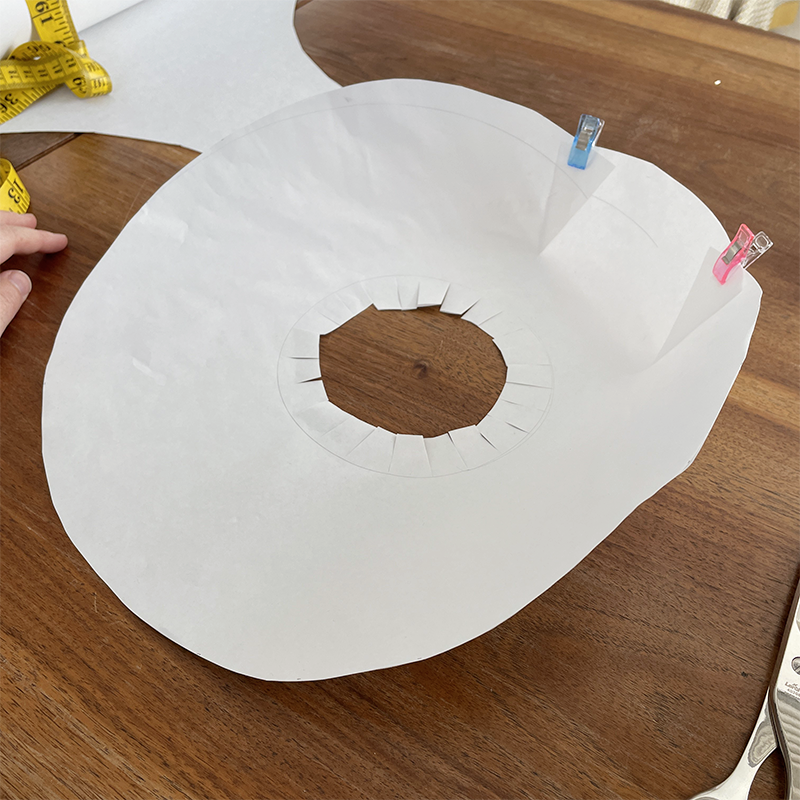
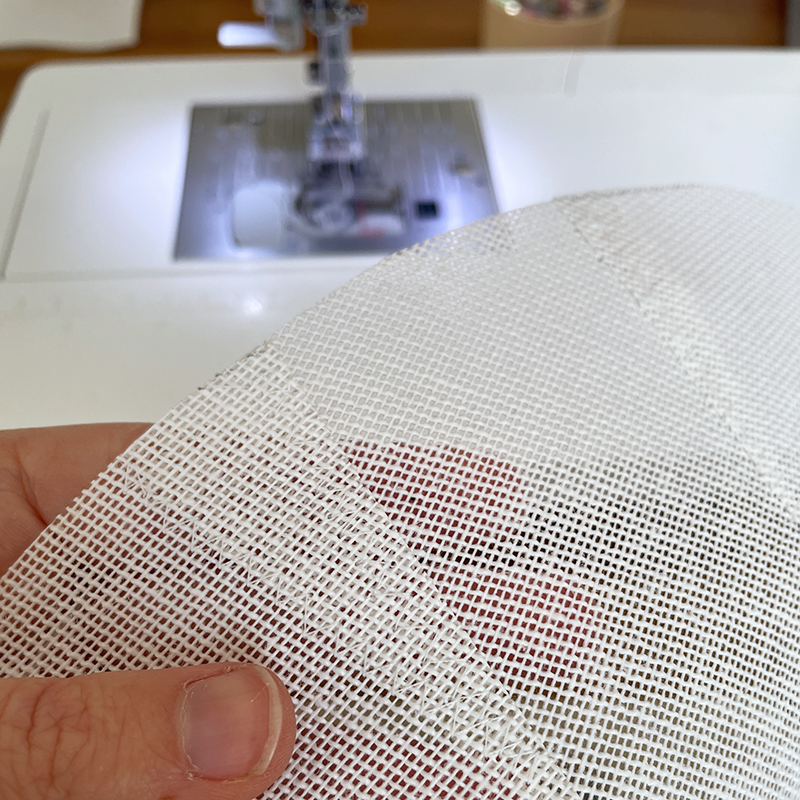
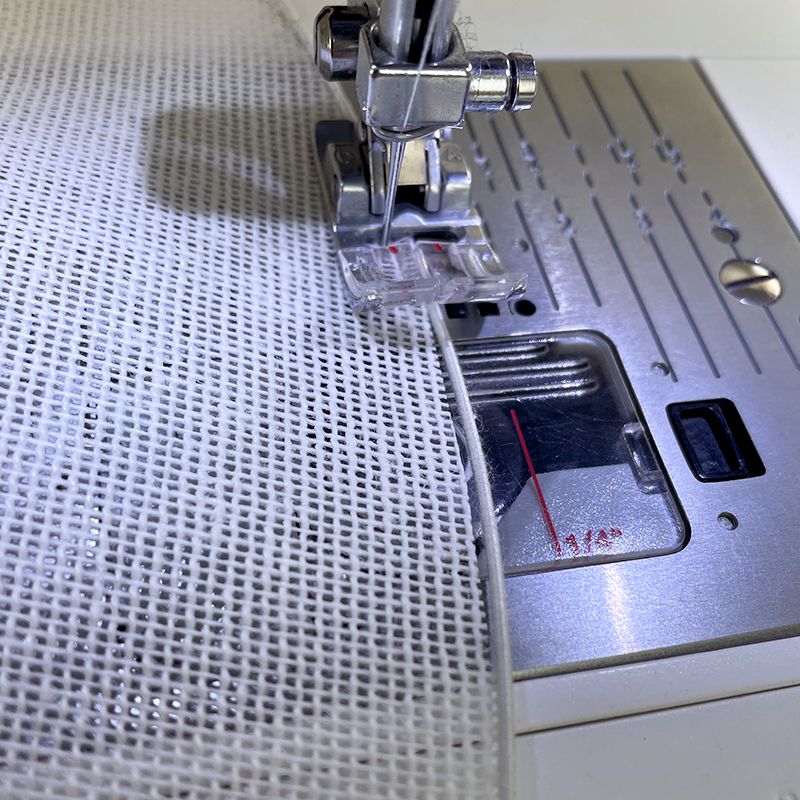
Erstmal habe ich mir aus Schnittmusterpapier einen „Probehut“ gebastelt, um die Größe auf meinem Kopf zu testen und die Form zu bestimmen. Verwendet habe ich dünnes Buckram, der ist mit Vorsicht mit der Maschine nähbar, was mir zeitplantechnisch sehr gelegen kam.
Actually, I already have a beautifully decorated Edwardian hat. But once I put it on my head I didn’t like it at all…so I quickly and spontaneously conjured up another hat. Of course the selection of hats is gigantic at the time, hard to decide, but I thought a more conspicuous hat should go with a simple dress.
First I made a „mock-up hat“ out of pattern paper to test the size on my head and to determine the shape. I used thin buckram, which can be sewn with the machine with care, which was very convenient for me in terms of the schedule.
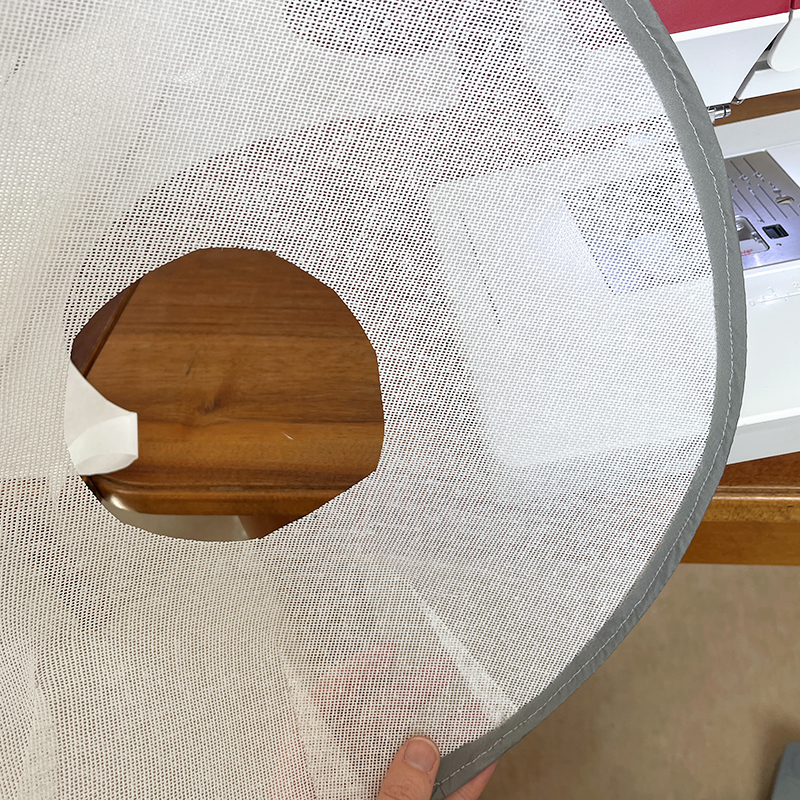
Mit Zickzack-Stich habe ich Hutdraht an der Krempe festgemacht und dann die Krempe mit einem ollen Schrägband eingefasst. Daran kann man Handstiche besser befestigen, als an Buckram selbst.
I attached hat wire to the brim with a zigzag stitch and then edged the brim with an bias binding. It’s easier to attach hand stitches to this than to the buckram itself.
Damit die eher scharfen Kanten der Abnäher nicht durch den Stoff durchdrücken habe ich sie mit einem Wattepad leicht gepolstert. Außerdem kommt als Zwischenfutter eine Schicht Flanell darüber. Das praktische: wenn man den auf den Buckram bügelt dann „klebt“ das regelrecht fest und lässt sich so ganz einfach festnähen, weil er schon fixiert ist.
So that the rather sharp edges of the darts don’t push through the fabric, I padded them lightly with a cotton pad. In addition, a layer of flannel is used as an intermediate lining. The practical thing: if you iron it onto the buckram, it really „sticks“ and can be easily sewn on because it’s already fixed.
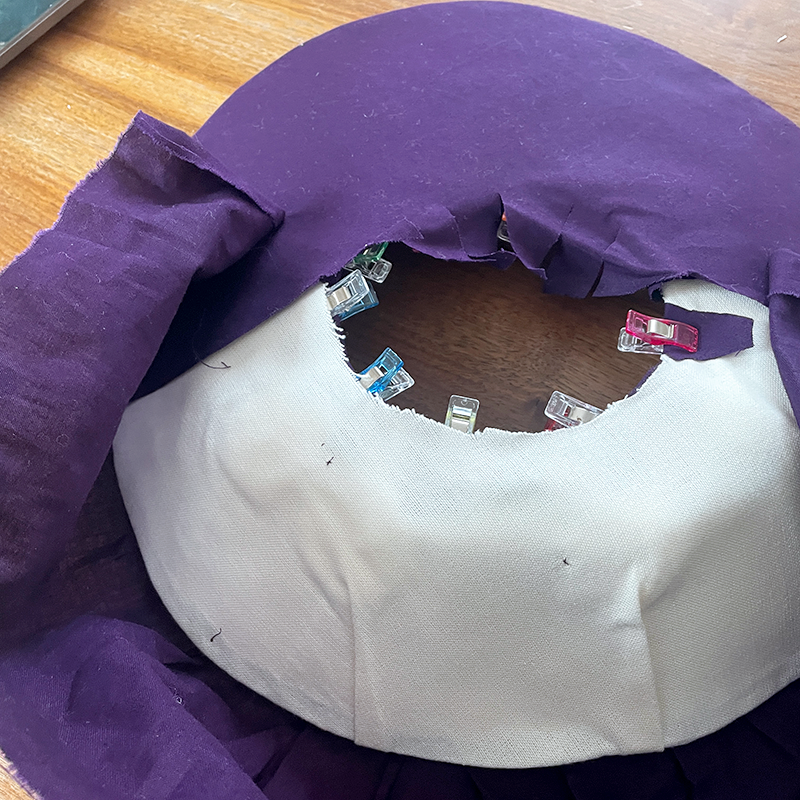
Da ich auf der Abnäher-Seite des Huts keine sichtbaren Abnäher wollte, habe ich mich für gerüschten Stoff entschieden. Dazu habe ich ein gerades Stück Stoff in Falten drapiert und fixiert. Auf der flachen Seite habe ich die Rundung des Hutes einfach aus Stoff ausgeschnitten und ebenfalls festgenäht.
Since I didn’t want visible darts on the dart side of the hat, I chose ruffled fabric to cover it. For this I draped and fixed a straight piece of fabric in folds. On the flat side I simply cut out the curve of the hat from fabric and sewed it on as well.

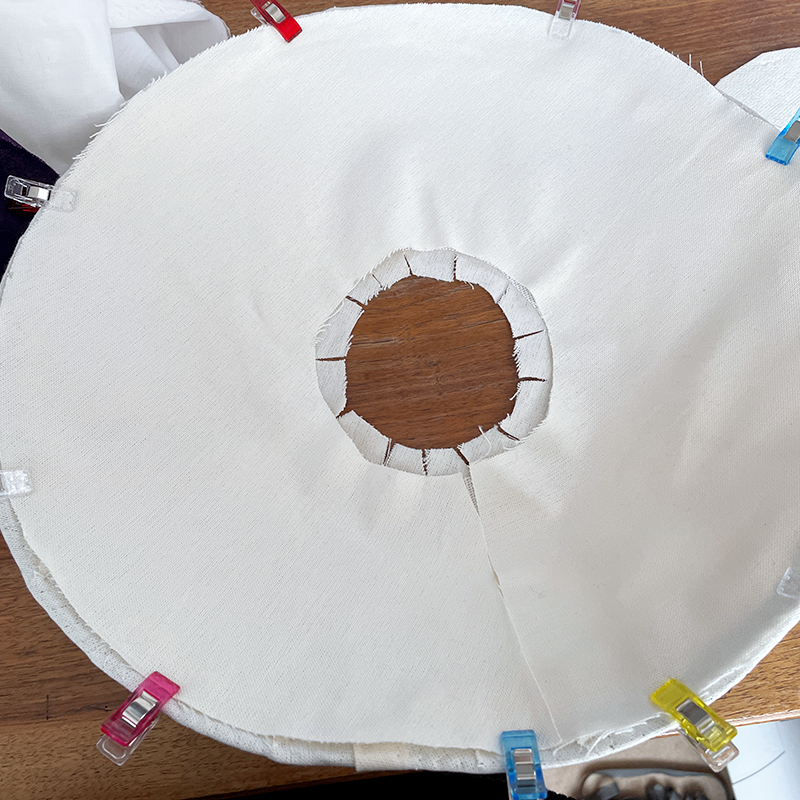
Die niedrige Krone habe ich ebenfalls von Hand eingefasst und dann in das Loch eingesetzt. Der Futterstoff verbirgt die offenen Stoffkanten.
I also set the low crown by hand and then inserted it into the hole. The lining hides the raw edges of the fabric.
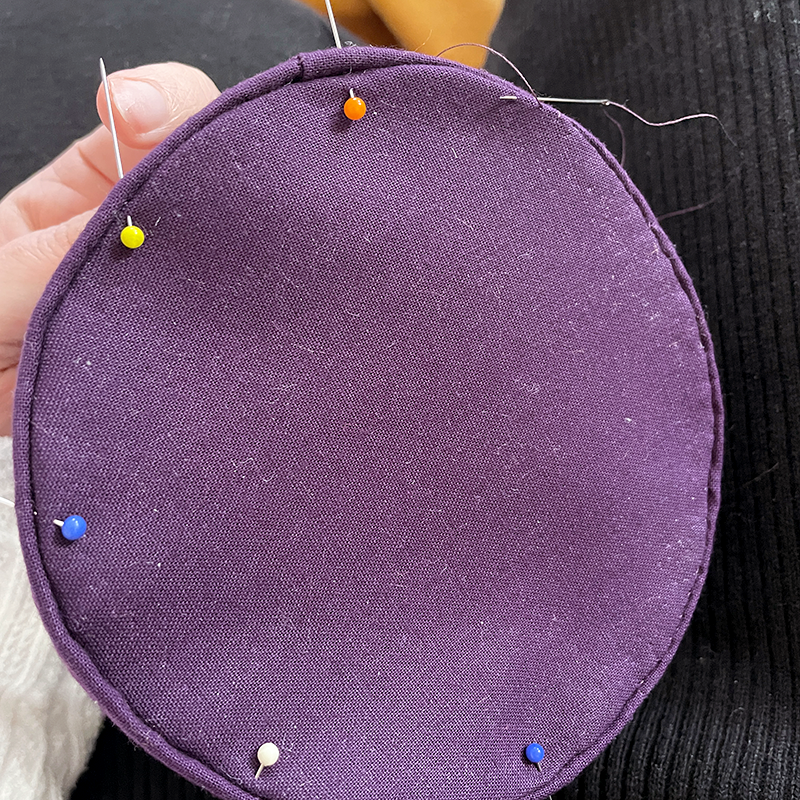

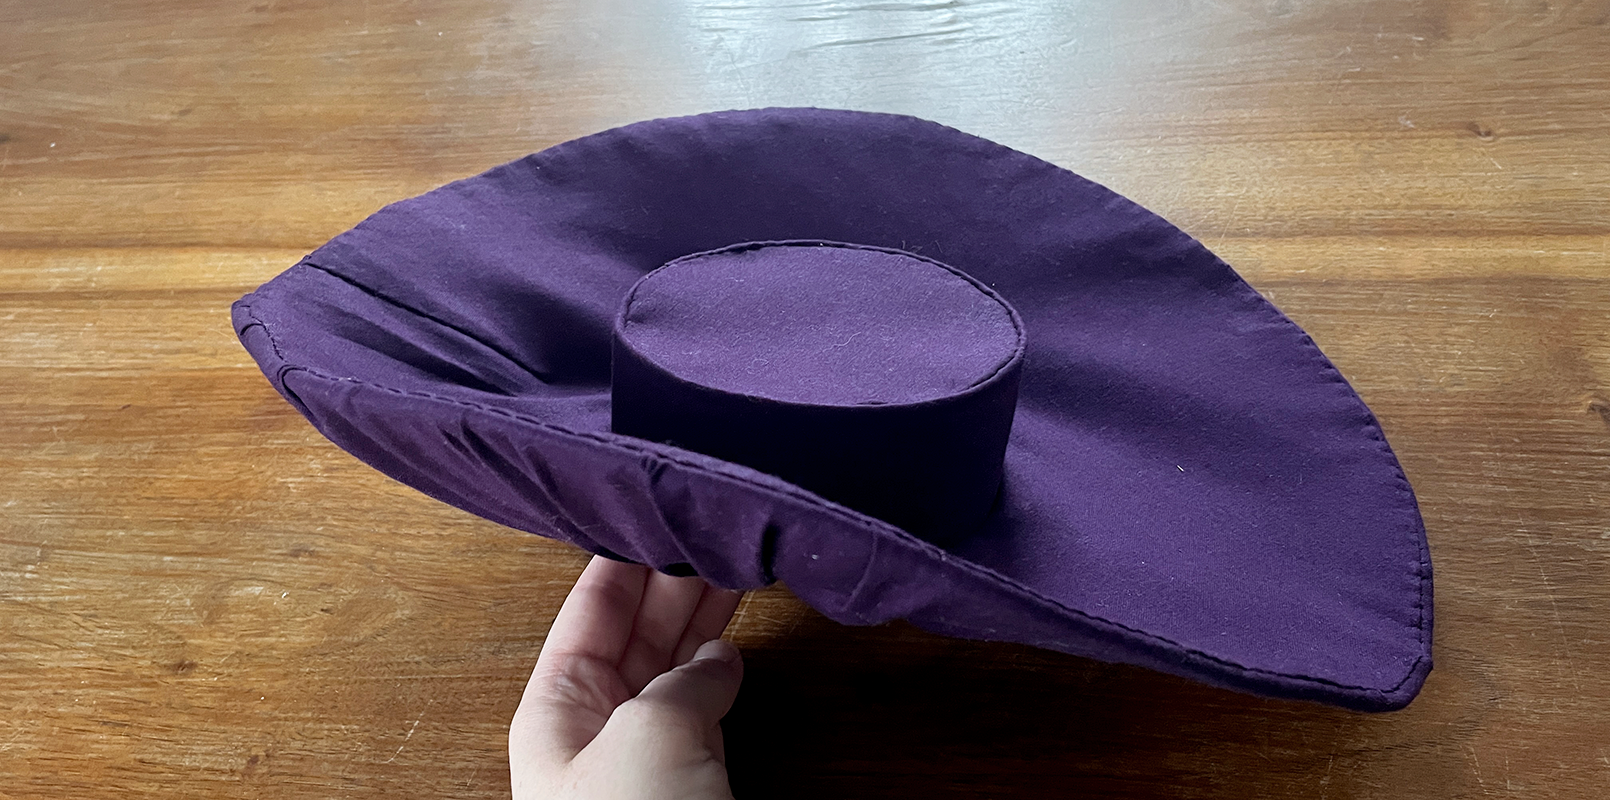
Der fertige Hut ohne Deko // The finished hat without decoration
Für Dekoration habe ich mich für eine schöne Schleife entschieden, die einfach aus Stoffstreifen hergestellt wurde. Und dann war Kreativität gefragt. Ich habe viel herumprobiert und zum einen will man die Form des Hutes nicht untergehen lassen, zum anderen soll der Hut auch nicht unterdekoriert sein. Hab mich schließlich für Tüll und Blumen entschieden und alles grob mit ein paar Stichen fixiert, damit mir nichts herunterpurzelt.
For decoration, I chose a beautiful bow that was simply made from strips of fabric. And then creativity was required. I’ve tried a lot and on the one hand you don’t want to loose the shape of the hat, on the other hand you don’t want the hat to be under-decorated. I finally decided on tulle and flowers and roughly fixed everything with a few stitches so that nothing tumbles down.